
How to use MVVM to tackle complicated TableView
UITableView is definitely one of the most frequently used UI components for every iOS developer. Due to the size limitation of the mobile phone, table view becomes a great way to present information while keeping the clearness of the UI design.
In the good old days, a table view contains typically cells displaying simple information such as a title with an image. And the only interaction is the selection of a cell.
But things change. Today, the table view is getting more and more complicated. Newsfeed, timeline, and wall have been widely adopted, a table view with various cells and asynchronous interactions is a new paradigm. So coding the complex UI is now challenging to developers.
In this article, we will talk how to organize your table view code with the Model-View-ViewModel (MVVM) pattern. MVVM is an architecture pattern that represents the view state using the data model. By making the UI logic a data model, we can use more Swift techniques. Such as protocol and closure to simplified the code in your table view. If you’re not familiar with MVVM, I recommend you to check my previous article for a holistic introduction to the MVVM pattern.
TD;DR
In this article, you will learn how to:
- Newsfeed App
- Hand over the UI jobs
- Create the ViewModel for cells
- Use Protocol to Reduce the Redundancy
- Handle the business logic separately;
- What to read if you want a deeper dive.
Let’s start! 💪
Newsfeed App
Now we are going to craft a newsfeed app. The home page of this app is a personalized “wall.” In the wall, there are two kinds of feeds, the photo feed, and the member feed. We’re going to cover the following use cases:
- The tableView displays Member’s cell and Photo’s cell correctly.
- The “+” button shows loading when waiting for the response of the follow-a-member API.
- Trigger the open-detail event when users press the Photo cell.
Here’s a teaser:
MemberCell
The member cell recommends members that you might want to follow. You can click on the “+” button in the cell. The cell has three states:


PhotoCell
The second type of the cell is a photo cell. In this cell, there are a title, description, and the photo itself. When users click on the cell, the app opens a corresponding photo detail view.

We assume that the response of the API call is decoded into two models: Member and Photo.
If you’re interested in how to make this app from zero to one, you can check my GitHub project GitHub — koromiko/TheGreatWall: Using MVVM to tackle complicated feed view. There are more techniques for consolidating your table view, so remember to check it after reading!
A quick look
Intuitively, we create one FeedListViewController containing a table view, make it as a dataSource and delegate of a table view. This is how the view controller looks like:
var feeds: [Feed] = [Feed]()
var tableView: UITableView

func viewDidLoad() {
    self.service.fetchFeeds { [weak self] feeds in
        self?.feeds = feeds
        self?.tableView.reloadData()
    }
}

func tableView(_ tableView: UITableView, numberOfRowsInSection section: Int) -> Int {
    return feeds.count
}

func tableView(_ tableView: UITableView, cellForRowAt indexPath: IndexPath) -> UITableViewCell {
    let feed = feeds[indexPath.row]
    if let memberFeed = feed as? Member, let cell = tableView.dequeueReusableCell(withIdentifier: MemberCell.cellIdentifier(), for: indexPath) as? MemberCell {
        cell.nameLabel.text = memberFeed.name
        cell.profileImageView.image = memberFeed.image
        cell.addBtn.isSelected = memberFeed.isFollwing
        return cell
    } else if let photoFeed = feed as? Photo, let cell = tableView.dequeueReusableCell(withIdentifier: PhotoCell.cellIdentifier(), for: indexPath) as? PhotoCell {
        cell.titleLabel.text = photoFeed.captial
        cell.descriptionLabel.text = photoFeed.description
        cell.coverImageView.image = photoFeed.image
        return cell
    } else {
        fatalError("Unhandled feed \(feed)")
    }
}
Then we need to handle the loading state of the Member cell. Normally, we use an array to save the loading state for all cells:
var cellLoadingStatus: [Bool]Then update cells by using this:
if cellLoadingStatus[indexPath.row] {
	cell.loadingIndicator.startAnimation()
} else {
	cell.loadingIndicator.stopAnimation()
}
We have one more thing to do. The state update should be handled, like this:
func updateLoadingState(isLoading: Bool, at indexPath: IndexPath) {
	cellLoadingStates[indexPath.row] = isLoading
	tableView.reloadRows(at indexPaths: [indexPath], with animation: .none)
}
It seems to work fine.
Unfortunately, the requirement changed (as it can be in a real life). We are requested to add one more cell type, let’s say, a place cell. What should we do? We’ll add a cell class, add one more else-if statement to the func tableView(tableView:,indexPath:) -> UITableViewCell. If the new cell has different states, we will add one more array to handle the state change and add a function to update the states. Phew! The fragmented code makes changing requirement a challenging task!
The following graph shows the architecture:
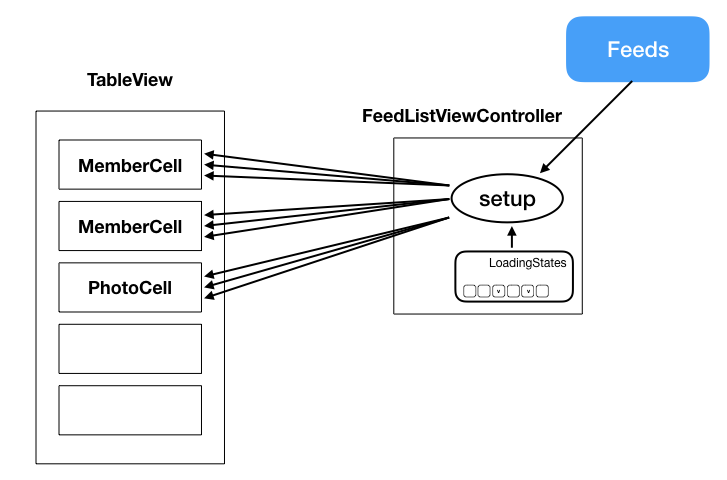
In the example above, the dataSource has the following responsibilities:
- Setups cells’ UI components such as the nameLabel, the imageView, etc.
- Records cells’ states, e.g., cellLoadingStates.
- Make an API call and save the model data.
Whenever we add a cell type, we do those tasks in the FeedListViewController, which is not scalable at all. A better way to do this would be separating the responsibilities to improve the scalability. Adding cell type should be more like plugging a USB device to a computer, which won’t change the design of the computer.
There is a lot of work to do, so let’s start with a small step! 🔨
Hand over the UI jobs
Back to the func tableView(tableView:, cellForRowAt indexPath: ) -> UITableViewCell,there’re UI setup such as assigning the nameLabel.text and the imageView.image. It’s not a good idea that dataSource knows the implementation detail of the cell. So our first step is to move the UI setup logic from the dataSource to the cell.
Based on this thought, we add an function to the MemberCell:
// In MemberCell.swift
func setup(name: String, profileImage: UIImage, isFollowing: Bool, isLoading: Bool) {
	self.nameLabel.text = name
	self.profileImageView.image = profileImage
	self.addBtn.isSelected = isFollowing
	if isLoading {
	    self.loadingIndicator.startAnimation()
	} else {
	    self.loadingIndicator.stopAnimation()
	}
}
With the help of the setup function, we are able to simplified the func tableView(tableView:, indexPath:) -> UITableViewCell, like this:
if let memberFeed = feed as? Member, let cell = tableView.dequeueReusableCell(withIdentifier: MemberCell.cellIdentifier(), for: indexPath) as? MemberCell {
    cell.setup(name: memberFeed.name,
               profileImage: memberFeed.image,
               isFollowing: memberFeed.isFollowing,
               isLoading: self.loadingStatus[indexPath.row])
    return cell
} else if let photoFeed = feed as? Photo, let cell = tableView.dequeueReusableCell(withIdentifier: PhotoCell.cellIdentifier(), for: indexPath) as? PhotoCell {
    cell.setup(title: photoFeed.title,
               description: photoFeed.description,
               image: photoFeed.image)
    return cell
} else {
    fatalError("Unhandled feed \(feed)")
}
We can see that there’re functions with more than three parameters. It’s better to have an object wrapping those parameters. Thus, here’s the MVVM to rescue! MVVM helps you encapsulate all UI logic into a simple object.
By turning UI manipulation into object manipulation, we significantly reduce the overhead of the dataSource as well as the ViewController.
Create the ViewModel for cells
Here’s our architecture proposal:
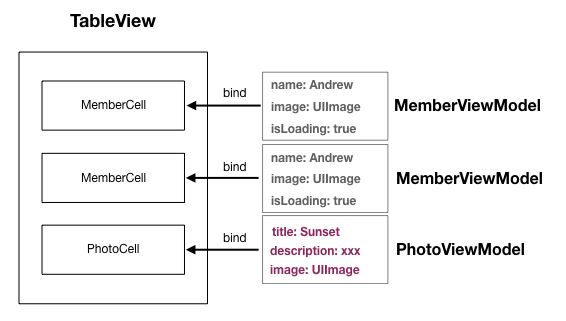
We plan to have two viewModels: MemberViewModel and PhotoViewModel, representing the MemberCell and the PhotoCell respectively. The ViewModel is a canonical form of the UI in a cell. We use bind techniques to bind the properties of the ViewModel to the UI components in the corresponding cell. It means that whenever we change a property of the ViewModel, the bond UI component in the cell changes responsively.
The implementation of the MemberViewModel looks like this:
class MemberCellViewModel {
    let name: String
    let avatar: UIImage
    let isLoading: Observable<Bool>
}
We use a customized object, Observable, as the binding tool. It keeps a generic type value and notifies the change of the stored value to the observer by triggering a closure named valueChanged. The implementation is pretty simple:
class Observable<T> {
    var value: T {
        didSet {
            DispatchQueue.main.async {
                self.valueChanged?(self.value)
            }
        }
    }
    var valueChanged: ((T) -> Void)?
}
If you’re interested in more detail about this binding techniques, please check the brilliant article Solving the binding problem with Swift • Five by Srđan Rašić.
Back to our project, the corresponding MemberCell looks like this:
// In MemberCell.swift
func setup(viewModel: MemberViewModel) {
    // The imange and the name won't be changed after setup
    profileImageView.image = viewModel.image
    nameLabel.text = viewModel.name

    // Listen to the change of the isLoading property to update the UI state
    viewModel.isLoading.valueChanged { [weak self] (isLoading) in
        if isLoading {
            self?.loadingIndicator.startAnimating()
        } else {
            self?.loadingIndicator.stopAnimating()
        }
    }
}
In the setup(viewModel:) function, we set the UI components on the cell using the information from the viewModel parameter. Besides, we set the valueChanged closure to listen to the value change of the isLoadingproperty. The isLoading becomes “true” when users press on the “+” button on the cell. By using MVVM, we simplify the parameter of the setup function. Moreover, converting the UI logic into object manipulation is of great benefit to more Swift techniques, which would be covered in the following section.
Here we have one more thing to do. In the cell, we use an escaping closure, valueChanged, to notify the cell of the UI update. Basically, the cell is reused when users scroll the table view. The relations between ViewModel and Cell could be represented by the following graph:
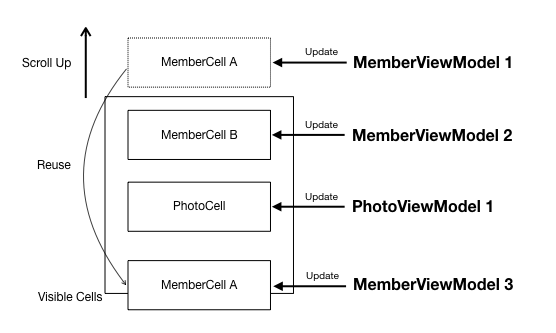
Let’s take a closer look at the MemberViewModel 1. In the beginning, the MemberCell A assign a closure to valueChanged of MemberViewModel 1 to observe the value change. When users scroll the table view, the MemberCell A becomes invisible. The instant of MemberCell A then is reused for the following cells. However, since the MemberViewModel 1 will not be released at this moment, the valueChanged of MemberViewModel 1 is still notifying the MemberCell A (which is representing a different feed). That is, the isLoading property of MemberViewModel 1 and MemberViewModel 3 updates the same cell and the glitch happens!
The solution is straightforward:
override func prepareForReuse() {
    super.prepareForReuse()
    viewModel?.isLoading.valueChanged = nil
}
Unregister the observer from the ViewModel to avoid the glitch.
Now, it’s time to clean up the dataSource!
let viewModel = viewModels[indexPath.row]
if let memberViewModel = viewModel as? MemberViewModel,
   let cell = tableView.dequeueReusableCell(withIdentifier: MemberCell.cellIdentifier(), for: indexPath) as? MemberCell {
    cell.setup(viewModel: memberViewModel)
    return cell
} else if let photoViewModel = viewModel as? PhotoViewModel,
          let cell = tableView.dequeueReusableCell(withIdentifier: PhotoCell.cellIdentifier(), for: indexPath) as? PhotoCell {
    cell.setup(viewModel: photoViewModel)
    return cell
} else {
    fatalError("Unhandled feed \(feed)")
}
The responsibility of the dataSource now is rather simple: setup the table view with cells’ ViewModels. On the other hand, the detail of setting up the UI components of cells are delegated to the cells. The states of cells are stored in the ViewModel (which is owned by the Controller instead of the ViewController). Isn’t it clearer? 🍸
Actually, there’s still room for improvement! Since we unified the interface of the cell, we can reduce the redundancy by using the Protocol technique!
Use Protocol to Reduce the Redundancy
In the func tableView(tableView:, indexPath:) -> UITableViewCell, there are two setup(viewModel:) function calls, with different types of input view models. We can use a Swift Protocol to create a generic setup function for all kinds of cells. Let’s create a protocol named CellConfigurable:
protocol CellConfiguraable {
    func setup(viewModel: RowViewModel) // Provide a generic function
}
This is a protocol of cells. The cell which confirms the protocol is able to be set up by using a RowViewModel instance. Meanwhile, the RowViewModel is another protocol:
protocol RowViewModel {}
// make view models conform the RowViewModel protocol
class MemberViewModel: RowViewModel {...}
class PhotoViewModel: RowViewModel {...}
The ViewModel conforms RowViewModel is able to be used to set up the CellConfigurable. By using the protocol, we are able to step further to clean up the dataSource:
func tableView(_ tableView: UITableView, cellForRowAt indexPath: IndexPath) -> UITableViewCell {
    let rowViewModel = self.viewModels[indexPath.row]
    let cell = tableView.dequeueReusableCell(withIdentifier: self.cellIdentifier(for: rowViewModel), for: indexPath)
    if let cell = cell as? CellConfiguraable {
        cell.setup(viewModel: rowViewModel)
    }
    return cell
}

/// Map the view model with the cell identifier (which will be moved to the Controller)
private func cellIdentifier(for viewModel: RowViewModel) {
    switch viewModel {
    case is PhotoCellViewModel:
        return PhotoCell.cellIdentifier()
    case is MemberCellViewModel:
        return MemberCell.cellIdentifier()
    default:
        fatalError("Unexpected view model type: \(viewModel)")
    }
}
Now adding a cell type won’t change the implementation of the func tableView(tableView:, indexPath:) -> UITableViewCell anymore! In other words, the scalability of the dataSource becomes great: the complexity remaining the same no matter how many cells we add!
More Protocol
A similar technique could be used to deal with the cell interaction:
protocol ViewModelPressible {
    var cellPressed: (()->Void)? { get set }
}
class PhotoViewModel: RowViewModel, ViewModelPressible {
    let title: String
    let desc: String
    var image: AsyncImage
var cellPressed: (() -> Void)? // Conform the ViewModelPressible protocol
}
We create a protocol named ViewModelPressible. There’s a required implementation: a closure variable named cellPressed. We then make the PhotoViewModel conform the ViewModelPressible by adding a variable, cellPressed. Conforming the ViewModelPressible means that the ViewModel is able to handle the user-press event.
In the table view’s delegate, we add an implementation of func tableView(_ tableView:, indexPath:):
func tableView(_ tableView: UITableView, didSelectRowAt indexPath: IndexPath) {
    let viewModel = self.viewModels[indexPath.row]
    if let viewModel = viewModel as? ViewModelPressible {
        rowViewModel.cellPressed?()
    }
}
Now all didSelectRow events are transposed to the corresponding ViewModel. The following example shows the usage:
// When creating the view model
let photoCellViewModel = PhotoCellViewModel()
photoCellViewModel.cellPressed = {
    print("Ask the coordinator or the view controller to open a photo viewer!")
}
Again, we successfully wrap the interaction into a ViewModel object and keep the clarity of the delegate of the table view!
After finishing all those works, let’s wipe the sweat off and zoom the camera out from the table view to the FeedListViewController! 🔭
Handle the business logic separately;
You must notice that the FeedListViewController has one more unrelated job:
- Setups cells’ UI components such as the nameLabel, the imageView, etc.
- Records cells’ states, e.g., cellLoadingStates.
- Make an API call and save the model data.
We need to recruit one more person to do this. Here’s an ideal architecture:
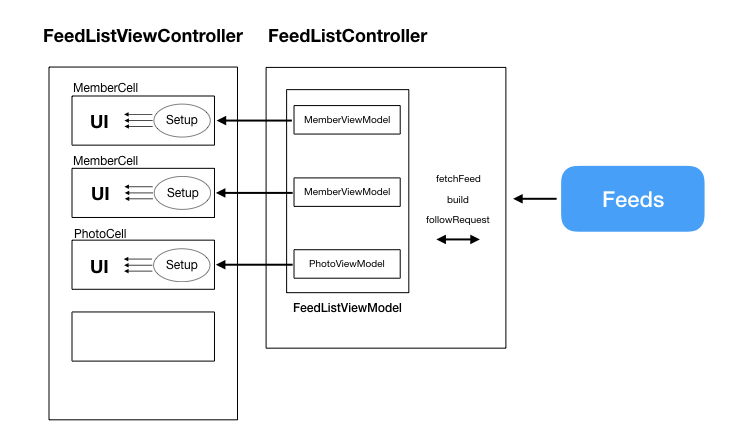
We want to make the FeedListViewController a simple view, and move the business logic to another person: FeedListController. The FeedListController takes the responsibility of making API call and save the data models. We can say that the FeedListController’s responsibility is to deal with the business logic. Based on this idea, let’s create a FeedListController:
// FeedListController.swift
let viewModels = Observable<[RowViewModel]>(value: [])

func start() {
    service.fetchFeed { [weak self] feeds in
        self?.buildViewModels(feeds: feeds)
    }
}

func buildViewModels(feeds: [Feed]) {
    var viewModels = [RowViewModel]()
    for feed in feeds {
        if let feed = feed as? Member {
            viewModels.append( MemberViewModel.from(feed) )
        } else if let feed = feed as? Photo {
            var photoViewModel = PhotoViewModel.from(feed)
            photoViewModel.cellPressed = { [weak self] in
                self?.handleCellPressed(feed)
            }
            viewModels.append(photoViewModel)
        }
    }
    self.viewModels.value = viewModels
}

func handleCellPressed(_ feed: Feed) {
    // Send analytics, fetch detail data, etc
    // Open detail photo view
}
From the snippet above, we can see that the controller doesn’t know the logic of any UI component. Instead, the ViewModel is created here as a middleman between the View and the Controller.
From another point of view, the FeedListViewController becomes:
var viewModels: Observable<[RowViewModel]> {
    return controller.viewModels
}

override func viewDidLoad() {
    viewModels.valueUpdate { [weak self] (_) in
        self?.tableView.reloadData()
    }
    controller.start()
}

func tableView(_ tableView: UITableView, numberOfRowsInSection section: Int) -> Int {
    return rowViewModels.value.count
}

func tableView(_ tableView: UITableView, cellForRowAt indexPath: IndexPath) -> UITableViewCell {
    let rowViewModel = self.rowViewModels.value[indexPath.row]
    let cell = tableView.dequeueReusableCell(withIdentifier: controller.cellIdentifier(for: rowViewModel), for: indexPath)
    if let cell = cell as? CellConfiguraable {
        cell.setup(viewModel: rowViewModel)
    }
    return cell
}

func tableView(_ tableView: UITableView, didSelectRowAt indexPath: IndexPath) {
    if let rowViewModel = rowViewModels.value[indexPath.row] as? ViewModelPressible {
        rowViewModel.cellPressed?()
    }
}
The only responsibility of the FeedViewController is to set up the table view, serve as the dataSource and the delegate of the table view. Adding cell types or modify the interaction won’t change this ViewController.
There are many advantages of doing this: it’s possible to write the unit test to test UI states, the user interaction, as well as the server connection behavior! In addition to the improvement of the testability, the scalability of the whole feed module is also improved!
In this article, we showed how to simplify a complicated table view by doing those changes:
- Make the cell handles the UI components setup;
- Use MVVM to abstract the UI components and interactions;
- Use protocol to consolidate the setup interface;
- Use Controller to handle to business logic.
Massive View Controller is a notorious anti-pattern. Now we know that the problem is not the MVC pattern itself. There are many ways to separate the responsibilities of your system, including but not limited to the MVVM pattern. I would say the MVVM pattern is a handful tool to improve the code quality, but it’s not a silver bullet. Besides of MVVM, we still need to take care of things such as the scalability, the testability and more principles like SOLID — Wikipedia. So, before adopting any architecture, please thoroughly understand the design of the architecture, carefully select the one that’s best fit your need.
Let’s get our hands dirty and start to craft a better system! 🍻