
Let’s imagine you have a small project, where you used to deliver new features in just 2 days. Then your project grows bigger. The delivery date becomes uncontrollable, from 2 days to 1 week, then 2 weeks. It drives you crazy! You keep complaining: a good product shouldn’t be so complicated! That’s exactly what I have faced and it was really a bad time for me. Now, after working for a few years in this area, cooperating with many excellent engineers, I realized that the product design doesn’t really make the code so complex. It’s me who makes it so complicated.
We could have the experience writing spaghetti code which significantly hurts the performance of our projects.The question is how can we fix it? A good architecture pattern might help. In this article, we are going to talk about one of the good architecture: Model-View-ViewModel (MVVM). MVVM is a trending iOS architecture that focuses on the separation of development of user interface from development of the business logic.
The term “good architecture” may sound way too abstract. It’s also difficult to know where to start. Here’s a tip: Instead of focusing on the definition of the architecture, we can focus on how to improve the testability of the code. There’re so many software architectures, such as MVC, MVP, MVVM, VIPER, It’s clear, we might not be able to master all of those architectures. However, we are still able to keep a simple rule in mind: no matter what architecture we decide to use, the ultimate goal is to make test simpler. Using this approach we start thinking before writing code. We put emphasis on how to separate responsibility intuitively. Moreover, the design of the architecture seems clear and reasonable with this mindset, we won’t stuck in trivial details anymore
TL;DR
In this article, you will learn:
- The reason we choose the MVVM over the Apple MVC
- How to adapt MVVM to design a clearer architecture
- How to write a simple real-world app based on the MVVM
You won’t see:
- The comparison between MVVM, VIPER, Clean, etc
- A silver bullet that will solve all problems
All of those architectures have the pros and the cons, but they are all designed to make the code simpler and clearer. So we decided to focus on why we select MVVM over MVC and how we move from MVC to MVVM. If you are interested in the cons of MVVM, please refer to the discussion at the end of this article.
So let’s start!
Apple MVC
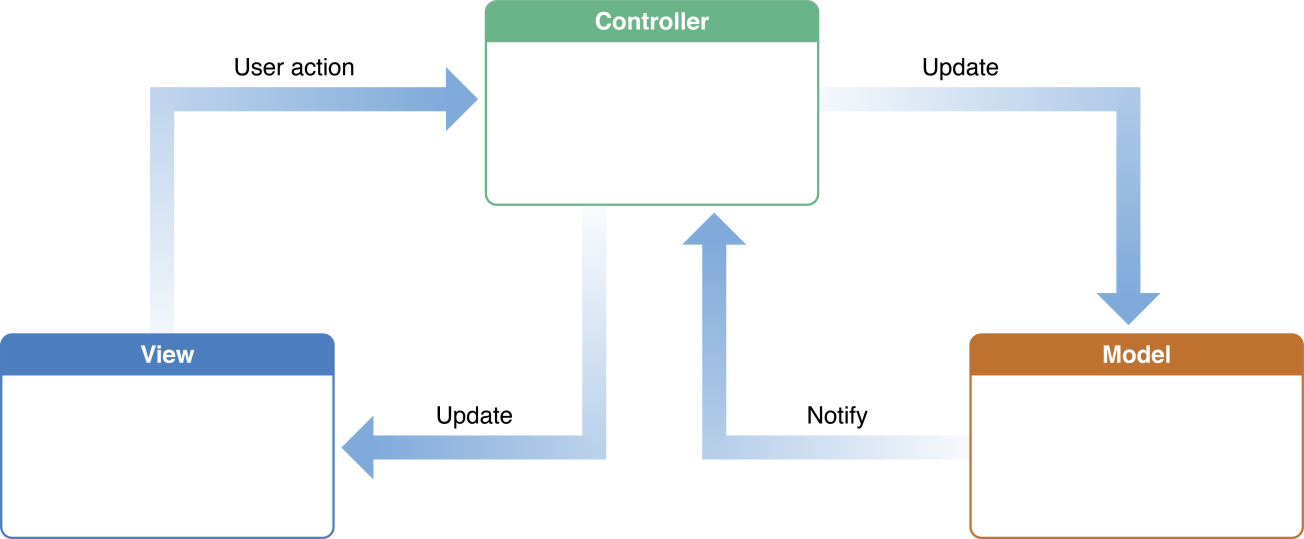
MVC (Model-View-Controller) is Apple’s recommended architectural pattern. The definition could be found here. The interaction between objects in the MVC is depicted as the following figure:
In iOS/MacOS development, due to the introduction of the ViewController, it usually becomes:
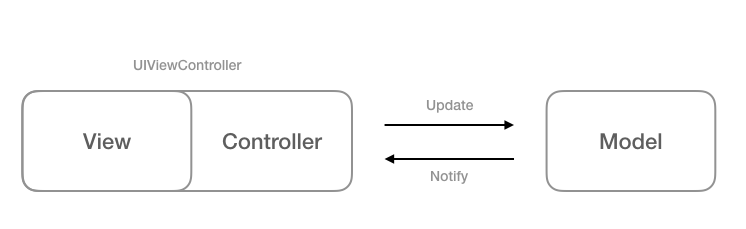
The ViewController contains the View and owns the Model. The problem is we used to write the controller code as well as the view code in the ViewController. It makes the ViewController too complex. That’s why we called it a Massive View Controller. While writing a test for the ViewController, you need to mock the view and the life cycle of it. But views are difficult to be mocked. And we actually don’t want to mock the view if we only want to test the controller logic. All these things make writing tests so complicated.
So the MVVM is here to rescue.
MVVM — Model — View — ViewModel
MVVM is proposed by John Gossman in 2005. The main purpose of the MVVM is to move the data state from the View to the ViewModel. The data flow in MVVM could be drawn as the following figure:
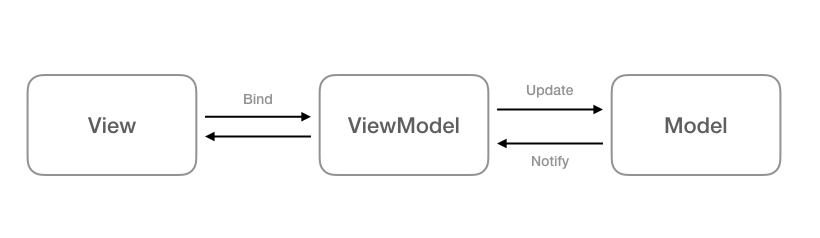
According to the definition, the View consists of only visual elements. In the View, we only do things like layout, animation, initializing UI components, etc. There’s a special layer between the View and the Model called the ViewModel. The ViewModel is a canonical representation of the View. That is, the ViewModel provides a set of interfaces, each of which represents a UI component in the View. We use a technique called “binding” to connect UI components to ViewModel interfaces. So, in MVVM, we don’t touch the View directly, we deal with business logic in the ViewModel and thus the View changes itself accordingly. We write presentational things such as converting Date to String in the ViewModel instead of the View. Therefore, it becomes possible to write a simpler test for the presentational logic without knowing the implementation of the View.
Let’s go back and take a higher look at the figure above. In general, the ViewModel receives the user interaction from the View, fetches data from the Model, then process the data to a set of ready-to-display properties. The View updates itself after observing the change of the ViewModel. That’s the whole story of the MVVM.
Specifically, for MVVM in iOS development, the UIView/UIViewController represent the View. We only do:
- Initiate/Layout/Present UI components.
- Bind UI components with the ViewModel.
On the other hand, in the ViewModel, we do:
- Write controller logics such as pagination, error handling, etc.
- Write presentational logic, provide interfaces to the View.
You might notice that the ViewModel is kinda complex. In the end of this article, we will discuss the bad part of the MVVM. Anyway, for a medium sized project, the MVVM is still a good choice to eat an elephant one bite at a time!
In the following sections, we are going to write a simple app with MVC pattern and then describe how to refactor the app to the MVVM pattern. The sample project with unit tests could be found on my GitHub:

Let’s start!
A simple gallery app — MVC
We are going to write a simple app, in which:
- The app fetches popular photos from 500px API and lists photos in a UITableView.
- Each cell in the table view shows a title, a description and the created date of a photo.
- Users are not allowed to click photos which are not labeled for_sale.
In this app, we have a struct named Photo, it represents a single photo. Here’s the interface of the Photo class:
The initial view controller of the app is a UIViewController containing a table view called PhotoListViewController. We fetch Photo objects through the APIService in the PhotoListViewController, and reload the table view after photos are fetched:
The PhotoListViewController is also a datasource of the table view:
In the func tableView(_ tableView: UITableView, cellForRowAt indexPath: IndexPath) -> UITableViewCell, we select the corresponding Photo object and assign the title, description, and the date to a cell. Since the Photo.date is a Date object, we have to convert it to a String using a DateFormatter.
The following code is the implementation of the table view delegate:
We select the corresponding Photo object in func tableView(_ tableView: UITableView, willSelectRowAt indexPath: IndexPath) -> IndexPath?, check the for_sale property. If it’s true, save the selectedIndexPath for a segue. If not, display an error message and return nil to prevent segueing.
The source code of PhotoListViewController could be found here, please refer to the tag “MVC”.
So what’s wrong with the code above? In the PhotoListViewController, we can find the presentational logic such as converting Date to String and when to start/stop the activity indicator. We also have the View code such as the implementation of showing/hiding the table view. In addition, there’s another dependency, the API service, in the view controller. If you plan to write tests for the PhotoListViewController, you will find that you’re stuck since it’s too complicated. We have to mock the APIService, mock the table view and mock the cell to test the whole PhotoListViewController. Phew!
Remember that we want to make writing tests easier? Let’s try MVVM approach!
Try MVVM
In order to solve the problem, our first priority is to clean up the view controller, split the view controller into two parts: the View and the ViewModel. To be specific, we are going to:
- Design a set of interfaces for binding.
- Move the presentational logic and controller logic to the ViewModel.
First thing first, let’s take a look at the UI components in the View:
- activity Indicator (loading/finish)
- tableView (show/hide)
- cells (title, description, created date)
So we can abstract the UI components to a set of canonical representations:
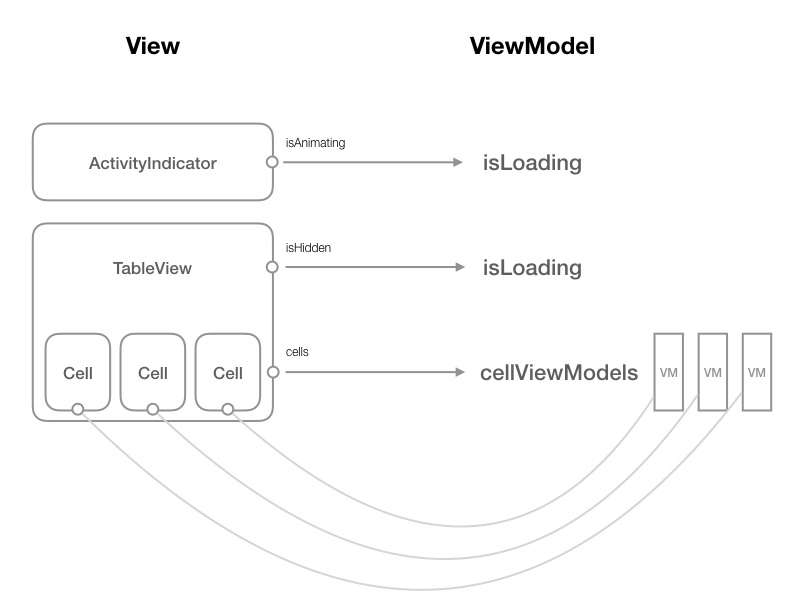
Each UI component has a corresponding property in the ViewModel. We can say that what we will see in the View should be the same as what we see in the ViewModel.
But how do we do the binding?
Implement the Binding with Closure
In Swift, there are various ways to achieve the “binding”:
- Use KVO (Key-Value Observing) pattern.
- Use 3rd party libraries for FRP (Functional Reactive Programming) such as RxSwift and ReactiveCocoa.
- Craft it yourself.
Using the KVO pattern isn’t a bad idea, but it might create a huge delegate method and we have to be careful about the addObserver/removeObserver, which might be a burden to the View. The ideal way for binding is to use the binding solution in FRP. If you are familiar with functional reactive programming then go for it! If not, I wouldn’t recommend using FRP just for binding because it’s kind of confusing to crack a nut using a sledgehammer. Here is a brilliant article talking about using the decorator pattern to craft the binding yourself. In this article, we are going to put things simpler. We bind things using a closure. Practically, in the ViewModel an interface/property for binding looks like this:
On the other hand, in the View, we assign a closure to the propChanged as a callback closure for value updates.
Every time the property prop is updated, the propChanged is called. So we are able to update the View according to the change of the ViewModel. Quite straightforward, right?
Interfaces for binding in ViewModel
Now, let’s start to design our ViewModel, the PhotoListViewModel. Given the following three UI components:
- tableView
- cells
- activity indicator
We create the interfaces/properties for binding in the PhotoListViewModel:
Each PhotoListCellViewModel object forms a canonical representation of a cell in the table view. It provides data interfaces for rendering a UITableView cell. We put all PhotoListCellViewModel objects into an array cellViewModels, the number of cells is exactly the number of items in that array. We can say that the array, cellViewModels, represents the table view. Once we update the cellViewModels in ViewModel, the closure reloadTableViewClosure will be called and the View updates correspondingly.
A single PhotoListCellViewModel looks like this:
As you can see, the properties of the PhotoListCellViewModel provide interface for binding to UI components in the View.
Bind the View with the ViewModel
With the interfaces for binding, now we’ll focus on the View part. First, in the PhotoListViewController, we initialize callback closures in viewDidLoad:
Then we are going to refactor the datasource. In MVC pattern, we setup presentational logics in the func tableView(_ tableView: UITableView, cellForRowAt indexPath: IndexPath) -> UITableViewCell, now we have to move the presentation logic to the ViewModel. The refactored datasource looks like:
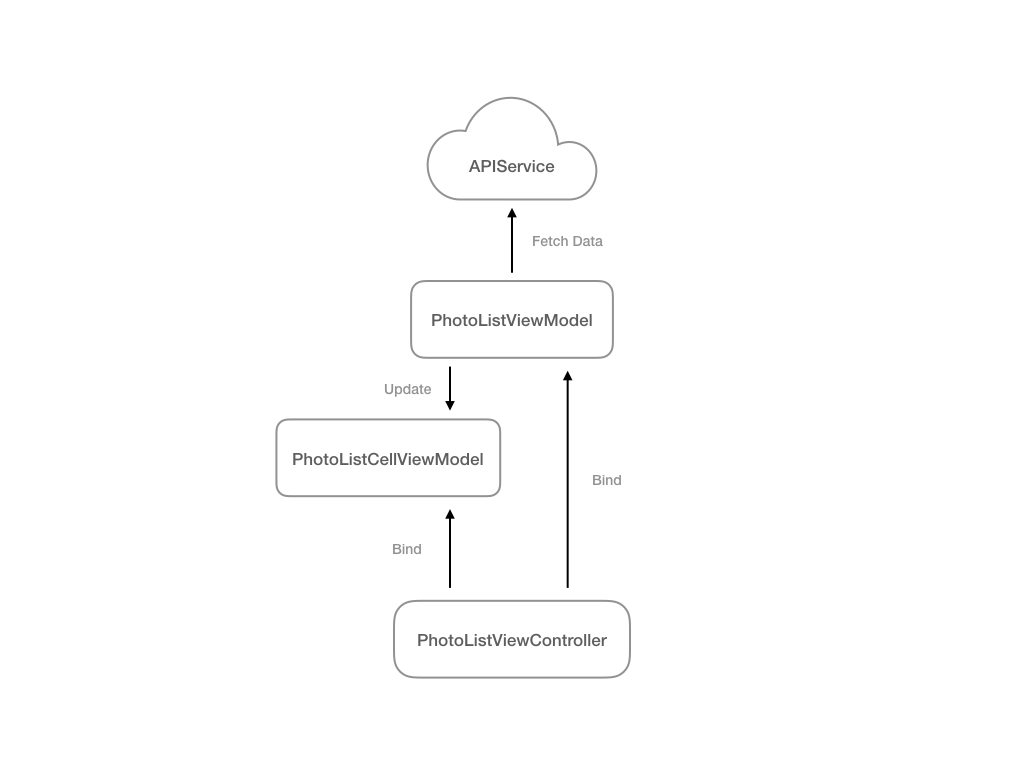
The data flow now becomes:
- The PhotoListViewModel starts to fetch data.
- After the data fetched, we create PhotoListCellViewModel objects and update the cellViewModels.
- The PhotoListViewController is notified of the update and then layouts cells using the updated cellViewModels.
It could be depicted as the following figure:
Dealing with user interaction
Let’s move on to the user interaction. In the PhotoListViewModel, we create a function:
When the user clicks on a single cell, the PhotoListViewController notifies the PhotoListViewModel using this function. So we can refactor the delegate method in PhotoListViewController:
It means that once the func tableView(_ tableView: UITableView, willSelectRowAt indexPath: IndexPath) -> IndexPath? was called due to a user interaction, the action is passed to the PhotoListViewModel. The delegate function decides whether to segue or not based on the property isAllowSegue provided by the PhotoListViewModel. We successfully remove the state from the View. 🍻
The Implementation of the PhotoListViewModel
It’s a long journey, right? Bear with me, we are touching the core of the MVVM! In the PhotoListViewModel, we have an array named cellViewModels, which represents the table view in the View.
How do we fetch data and get the array ready? We actually do two things in the initialization of the ViewModel:
1. Inject the dependency: the APIService
2. Fetch data using the APIService
In the code snippet above, we set the property isLoading to true before starting to fetch the data from the APIService. Thanks to the binding we did before, set the isLoading to true means that the View will switch the active indicator on. In the callback closure of the APIService, we process the fetched photo models and set the isLoading to false. We don’t need to touch the UI component directly, but it’s clear that the UI components work as what we expected when we changed those properties of the ViewModel.
Then here’s the implementation of the processFetchedPhoto( photos: [Photo] ) :
It does a simple job, wrapping the photo models into an array of PhotoListCellViewModel. When the property, cellViewModels, is updated the table view in the View reloads correspondingly.
Yay, we crafted the MVVM 🎉
The sample app could be found on my GitHub:

You might want to try the MVC version (tag: MVC) and then the MVVM one (the latest commit)
Recap
In this article, we successfully converted a simple app from the MVC pattern to the MVVM pattern. And we:
- Made a binding theme using the closure.
- Removed all controller logic from the View.
- Created a testable ViewModel.
Discussion
As I mentioned above, architectures all have the pros and the cons. After reading my article, you must have some ideas about what’s the cons of the MVVM. There are good articles talking about the bad parts of the MVVM, such as:
MVVM is Not Very Good — Soroush Khanlou
The Problems with MVVM on iOS — Daniel Hall
My biggest concern about MVVM is the ViewModel does too many things. As I mentioned in this article, we have the controller and the presenter in the ViewModel. Also, two roles, the builder and the router, are not included in the MVVM pattern. We used to put the builder and the router in the ViewController. If you’re interested in a clearer solution, you might want to check the MVVM+FlowController (Improve your iOS Architecture with FlowControllers) and two well-known architecture, VIPER and Clean by Uncle Bob.
Start small
There’s always a better solution. As professional engineers, we’re always learning how to improve the code quality. Developers like me were used to be overwhelmed by so many architectures and don’t know how to start writing unit tests. So the MVVM is a good place to begin your journey. It’s simple and the testability is still good. In another Soroush Khanlou’s article, 8 Patterns to Help You Destroy Massive View Controller, there are many good patterns and some of them are also adopted by the MVVM. Instead of being hampered by a gigantic architecture, how about we start writing test with small yet powerful MVVM pattern?
“The secret to getting ahead is getting started.” — Mark Twain
In the next article, I will continue to talk about writing unit tests for our simple gallery app. Stay tuned!
If you have any questions please don’t hesitate to leave a comment. Any kind of discussion is also welcome! Thank you for your attention.
References
Introduction to Model/View/ViewModel pattern for building WPF apps — John Gossman
Introduction to MVVM — objc
iOS Architecture Patterns — Bohdan Orlov
Model-View-ViewModel with swift — SwiftyJimmy
Swift Tutorial: An Introduction to the MVVM Design Pattern — DINO BARTOŠAK
MVVM — Writing a Testable Presentation Layer with MVVM — Brent Edwards
Bindings, Generics, Swift and MVVM — Srdan Rasic