
In my previous article, How not to get desperate with MVVM implementation, we learned the Model-View-ViewModel (MVVM) architecture and saw how to create a simple gallery app by using it. With the help of the MVVM, we separate the business logic and presentational logic from the view logic. The separation of concerns (SoC) makes writing unit tests easier than ever. Even though the idea of the MVVM is simple, writing unit tests for its various use cases is still worth mentioning. So in this article, we will step further and learn how to brew unit tests for MVVM.
In short, I will cover two techniques:
- How to design a mock to simulate different network states.
- How to use stubs to test user interaction.
Let’s start with the gallery app we crafted in my previous guide, mentioned above.
A simple gallery app
To recall, the simple gallery app has the following functionalities:
- The app fetches popular photos from 500px API and lists photos in a UITableView.
- Each cell in the table view shows a title, a description and the created date of a photo.
The first screen in the app is called PhotoListViewController, the data flow is depicted in this figure:
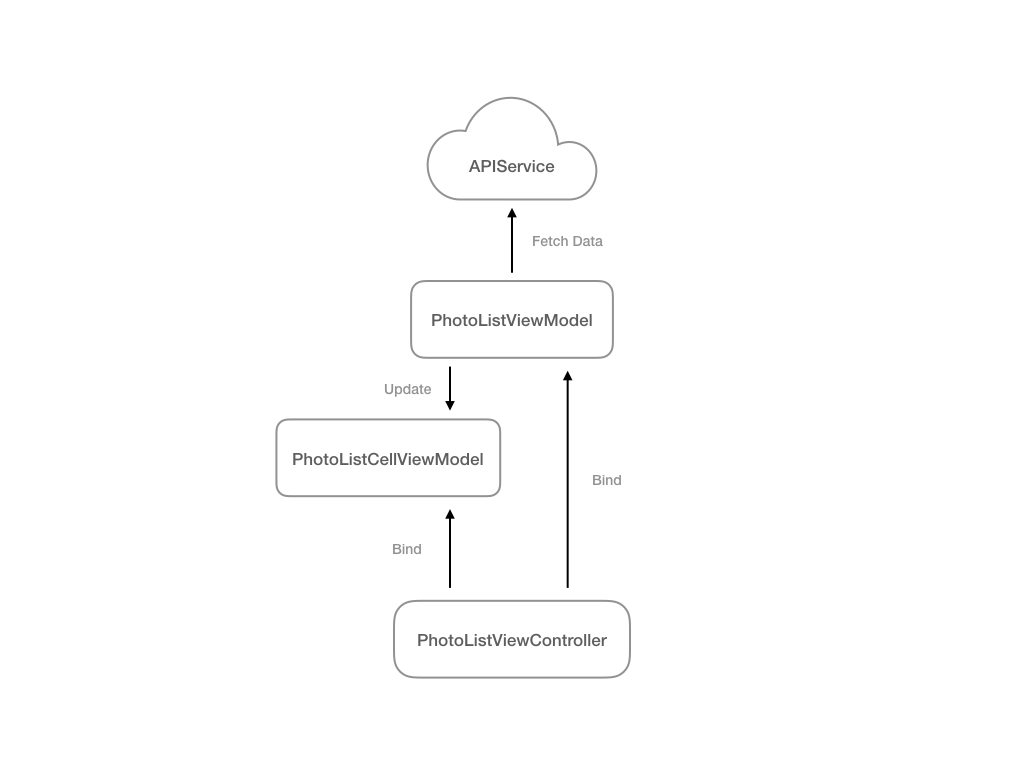
The APIService takes the responsibility of the network layer, such as setting up the URL, sending the request, etc. The PhotoListViewModel asks the APIService for photo objects and provides the presentational interfaces for the PhotoListViewController. The PhotoListViewController is a simple View, rendering the visible element according to the data presented by the PhotoListViewModel.
Here are some use cases that we are going to test in this article:
- The PhotoListViewModel should fetch data from the APIService.
- The PhotoListViewModel should display an error message if the request failed.
The PhotoListViewModel should allow the segue to the detail page if a user presses on a “for sale” photo.
MVVM and Dependency Injection
Here’s part of the implementation of the PhotoListViewModel:
We use a technique named dependency injection (DI) to design our PhotoListViewModel. The property, apiService, is a dependency of the PhotoListViewModal. The apiService takes care of all networking things and provide a handful interface for the PhotoListViewModel to get returned data. The most important thing is, it can be assigned by all objects conforming the APIServiceProtocol.
In the production environment we assign an APIService object, which connects to a real server, to the PhotoListViewModel. On the other hand, in the test environment, we inject a mock APIService object instead. The mock APIService (MockAPIService) object doesn’t connect to the real server, it’s an object designed only for the test. Both APIService and MockAPIService conform the protocol, APIServiceProtocol, so that we are able to inject different dependency in different situation.
If you’re not familiar with the idea of dependency injection, feel free to check my article: The complete guide to Network Unit Testing in Swift :)
The following figure shows the relationship between the PhotoListViewModel and its dependency:
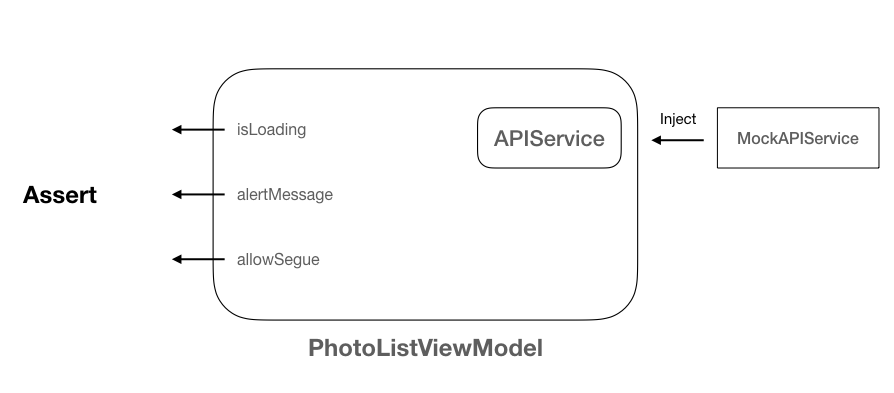
The idea of injection will be more clear in the setUp() and the tearDown() code snippets below. We initialize the PhotoListViewModel with an APIService object, but we use a MockAPIService object instead in the test environment:
In the following section, we are going to see how to design the MockAPIService to simulate a different situations for all test cases.
Behavior test
Our first use case is:
- The PhotoListViewModel should fetch data from the APIService.
That is, we want to check if the PhotoListViewModel really requests data from the APIService.
Here’s the implementation of the mock:
In order to be injected into the PhotoListViewModel, the mock should conform the APIServiceProtocol protocol. So we create the required method, fetchPopularPhoto(complete:) to conform the protocol. Now we want to make sure if the PhotoListViewModel called the fetchPopularPhoto(complete:) method to fetch the data, so we create a property, isFetchPopularPhotoCalled, in the MockAPIService. Remember that the apiService property is a MockAPIServiceobject in a test environment? The isFetchPopularPhotoCalled will be set to true if the mock function fetchPopularPhoto(complete:) is called by the PhotoListViewModel.
Here’s is the code for our first test:
This is a simple test case. The sut (SUT, System Under Test) is a PhotoListViewModel instance. The code snippet shows that when the PhotoListViewModel fetches data, we check if it called the fetchPopularPhoto(complete:) method. By using this technique, we are able to check if PhotoListViewModel calls specified methods for the dependency injection. In other words, we successfully test the behavior of our ViewModel.
Success or Failure?
In addition to the behavior test, we also want to see if the PhotoListViewModel correctly handles networking states. By using the DI technique, we are able to simulate the success and failure networking states by changing the response of the MockAPIService. In this section, we are going to see how to change the response state of the MockAPIService. Let’s check the second use case as in the example below:
- The PhotoListViewModel should display an error message if the request failed.
According to the use case, we write the following test code:
The error object represents the given condition of this test case: the request will fail due to a permission issue. After setting up the given condition, we call sut.initFetch() to start fetching data. Then here’s a trick: we ask the mock to fail the request by calling the fetchFail(error:) function. Finally, we assert the alert message of the PhotoListViewModel to see if it handles the error correctly.
So, how to design the MockAPIService? Let’s go back to the implementation of the PhotoListViewModel.initFetch():
The initFetch() triggers the apiService.fetchPopularPhoto(complete:), assigns a callback closure, and waits for the apiService to call the callback closure. The callback closure is the key!. If we want to simulate a failed request, we can trigger that closure with an error in the MockAPIService. This is the implementation of the MockAPIService:
In the code snippet, when the fetchPopularPhoto(complete:) is called, the callback closure is saved to the completeClosure for the later use. On the other hand, for the PhotoListViewModel, the function call is finished but the escaping closure is still pending. The closure won’t be triggered until the fetchSuccess() or the fetchFail(error:) is called. Finally, when we call the fetchSuccess() or the fetchFail(error:), the PhotoListViewModel receives the response data and continue to finish its jobs.
Now the MockAPIService is able to simulate any kind of asynchronous request. For example, we are able to assert the loading state of the ViewModel: isLoading should be true before fetchSuccess() is called. This is a powerful technique because it mimics an async call, and it could be done immediately.
Let’s get some stubs ready
The ViewModel receives the user interaction and changes the presentation with respect to the interaction. In MVVM, the user interactions are abstracted into a set of methods such as userPressed(), userSwipe(), etc. Therefore, testing the user interactions is straightforward: we call a certain method and assert the corresponding property of the ViewModel. Let’s check the third use case we are going to test:
- The PhotoListViewModel should allow the segue to the detail page if a user presses on a “for sale” photo.
As we did before, we first write the test code:
This test case describes a user who presses on the first cell, and we are going to see if the segue is allowed. The problem is, we haven’t fetched any photo yet and the sut is currently in the empty state. So if we trigger the sut.userPressed(at:) at this stage, the out of bounds exception will be raised. We need to grab some data first!
The data we need is Photo objects. We want the MockAPIService to return the photo objects to the PhotoListViewModel, just like what it’s supposed to be in the production environment. After the apiService returns the data to the PhotoListViewModel, we are able to trigger the sut.userPressed(at:) and assert the isAllowSegue. The photo objects we created for the test are called “stubs”. I won’t dive deep into the definition of “stub”, but if you’re interested, go check my article on cracking tests for Core Data.
The implementation of the MockAPIService now becomes:
We create an array, completePhotos, to save the stubs. And those stubs will be returns to the PhotoListViewModel once the PhotoListViewModel calls fetchPopularPhoto(complete:). Then let’s take a look at our test code:
The StubGenerator().stubPhotos() generates couple of photo objects. Then we assign the photo objects to the mockAPIService.completePhotos. When the request finished (mockAPIService.fetchSuccess() is called), the PhotoListViewModel will receive those photo stubs via the callback closure. With the help of those stubs, we are able to assert a certain action such as user presses on a specific IndexPath and so on.
More tests…
We are able to use the knowledge we have learned to write more test cases:
- The loading animation should start when the network request starts.
- The loading animation should stop when the request completes.
- The table view should render correctly.
- It should display error message when user press on the photo that is not for sale.
All of those are included in my GitHub:

Recap
In this article we used a MockAPIService to check:
- If the SUT correctly interacts with the APIService.
- If the SUT handles the error state correctly.
- If the SUT handles the user interaction correctly.
Conclusion
There are still a lot of things to do. As I mentioned in my previous article, the MVVM has its limitations and cons, such as the anti-pattern of the single-responsibility and the lack of the builder and the router. When it comes to writing tests, I didn’t cover the unit test for the binding and routing. Besides, the state of the SUT could be handled better (There’s a good article talking about the state: iOS Architecture: A State Container based approach).
However, the MVVM does remove the obstacle in writing tests: it’s easier to test the presentational logic. And writing tests for user interaction becomes straightforward as well. The most important thing is that the MVVM is simple and intuitive. It’s a good start point for you to understand the idea of dependency injection and module composition. In the following articles, I’ll continuously refactor our simple gallery app to make it more consolidated and beautiful. So, stay tuned!
Reference
Testing View Controller — Part 1 — Clean Swift
Unit Testing iOS in Swift — Part 2: A Testable Architecture
How to unit test ViewModel in Swift — SwiftyJimmy