
iOS/macOS development is really interesting.
You can get domain knowledge in so many fields! You might learn the graphic techniques such as Bezier or 3D transform. And you need to understand how to work with database or design an efficient schema. Moreover, you should be able to manage memory in an embedded-system way (especially for those who were in the great MRC era). All of those make iOS/macOS development so diverse and also challenging.
In this article, we’ll learn yet another thing you probably need to know: Continuous Delivery (CD). Continuous Delivery is a software approach that helps you release products reliably, at any time. The CD usually comes with the term Continuous Integration (CI). CI is also a software engineering technique. It means that the system continuously merges developers’ works to a mainline all the time. Both CI and CD are not only useful to a big team but also useful to a one-man team. And if you are a sole developer in a one-man team, CD probably means more to you since delivery is unavoidable to every application developer. So this article will focus on how to build a CD system for your application. Fortunately, all of those techniques can be adopted in the construction of a CI system as well.
Imagine that we are developing an iOS app named Brewer, then our workflow will look pretty simple:
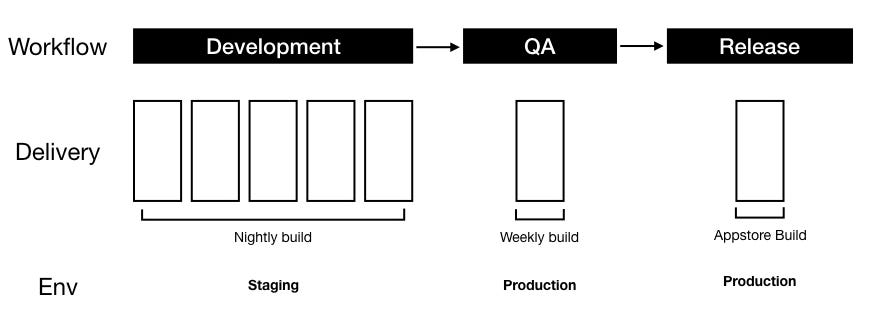
First, we develop. Then QA team helps us manually test the app. After the QA approves the test build, we release (submit to the AppStore for review) our app. In different stages, we have different environments. During development, we build the app in a staging environment for testing every day/night. When QA team is testing, we prepare an app built with production environment. This could be a weekly build specially for QA team. Finally, we submit the app using Production environment. Such final builds could have no predefined schedule at all.
Let’s take a deeper look at the delivery part. You might find that we have a lot of duplicated work on building test apps. Here’s what the CD system can help you with. Specifically, our CD system needs to:
- Build the app in different environments (staging/production).
- Sign the code according to the environment we choose.
- Export the app and send it to a distribution platform (such as Crashlytics and TestFlight).
- Build the app according to a specific schedule.
Outline
Here is what we’re gonna do in this article:
- Setup your project: How to setup your project to support the switch between different environments.
- Sign the code manually: How to handle the certificate and provisioning profile manually.
- Standalone environment: How to Use Bundler to isolate the system environment.
- Build with fastlane 🚀: How to build and export the app using fastlane.
- Jenkins will be your server for tonight: How Jenkins helps you scheduling your tasks.
Before we start, you probably want to check out:
- What’s fastlane
- What’s Jenkins
- What’s Code signing
If you’re a busy guy/girl, no worries, I made the Brewer app a public repository with sample script for you!

So, let’s start!
Setup your project
We usually connect to a development server or a staging server on developer test stage. We also need to connect to a production server when releasing the app to a QA team or AppStore. Switching the server by editing the code might be not a good idea. Here we use the build configuration and the compiler flag in Xcode. We won’t dive into detail about the configuration. If you’re interested in the setup, check this great article by Yuri Chukhlib:

In our Brewer project, we have three build configurations:
- Staging
- Production
- Release
Each of which maps to a specific Bundle identifier:

We set up the flag to help our code know which server environment are we using.

So we can do something like this:
Now we are able to change the staging/production environment by changing the build configuration, without modifying any code! 🎉
Sign the code manually

This is a well-known red button for every iOS/macOS developer. We start every project by unchecking this box. But why it’s so notorious? You might know that it download the certificate and the provisioning profile, embed those to your project and system. If any file missed, it makes a new one for you. For a one-man team, nothing wrong here. But if you’re in a big team, you might accidentally refresh the original certificate, and then the building system stops working due to the invalid certificate. To us, it’s a black box hiding too much information.
So in our Brewer project, we want to do this by hand. We have three app IDs in our configuration:
- works.sth.brewer.staging
- works.sth.brewer.production
- works.sth.brewer
We’ll focus on first two configurations in this article. Now we need to prepare:
- Certificate: An Ad Hoc/App Store distribution certificate, in .p12 format.
- Provisioning Profiles: Ad Hoc distribution provisioning profiles for two app identifiers, works.sth.brewer.stagingand works.sth.brewer.production.
Note that we need the p12 format of the certificate file, since we want it to be portable to different machines, and only .p12 format containing the private key to the certificate. Check this to see how to convert .cer file (DEM format) to .p12 (P12 format) file.
Now we have our code signing files in a folder:

Those files are used by the CD system, so please put the folder on the CD machine. Please don’t put those files with your project, don’t commit them to your project repository. It’s okay to host the code signing files in a different private repository. You might want to check the security discussion in match — fastlane docs.
Build with fastlane 🚀
fastlane is a tool that automates the development and release workflow. For example, it can build the app, run the unit test, and upload the binary to Crashlytics, in one script. You don’t need to do those things step by step manually.
In this project, we are going to use fastlane to accomplish two tasks:
- Build and release the app running in a staging environment.
- Build and release the app running in a production environment.
The difference between those two methods is merely the configuration. The shared tasks are:
- Sign the code with the certificate and the provisioning profile
- Build and export the app
- Upload the app to Crashlytics (or other distribution platform)
Knowing our tasks, we can start to write the fastlane script now. We will use the fastlane for Swift to write our script in this project. The fastlane for Swift is still in beta, so everything works well except:
- It doesn’t support plugins
- It doesn’t catch exceptions
But writing the script in Swift makes it more readable and maintainable for the developers. And you are able to convert the Swift script to Ruby script with ease. So let’s try it!
We first start our project (still remember the Bundler?):
bundler exec fastlane init swift
Then, you are able to find a script in fastlane/Fastfile.swift. In the script, there’s a fastfile class. It’s our main program. Every method named with postfix, “Lane”, in this class is a lane. We can add predefined actions to a lane, and execute the lane with a command:
bundle exec fastlane <lane name>.
Let’s fill in some code:
We create two lanes: developerRelease and qaRelease for our tasks. Both tasks do the same thing: build a package with the specific configuration and upload the exported ipa to Crashlytics.
There’s a method package in both lane. The interface of package() looks like:
The parameter is an object conforming the protocol Configuration. The definition of the Configuration is:
Then we create two structs conforming the protocol:
Using the protocol, we are able to make sure every configuration comes with required settings. And we don’t need to write the package detail every time when we have a new configuration.
So how does the package(config:) looks like? First, it needs to import the certificate from the file system. Remember our code signing folder? We use importCertificate action to achieve our goal.
keychainName is the name of your Keychain, the default one is called “login”. The keychainPassword is the password to your Keychain, fastlane uses it to unlock your Keychain. Since we commit the Fastfile.swift to the repository to make sure the delivery code is consistent in every machine, it’s a bad idea to write the passwords as string literals in the Fastfile.swift. Therefore, we use environment variable to replace the string literal. In the system, we save environment variable by:
export KEYCHAIN_NAME=”KEYCHAIN_NAME”;
export KEYCHAIN_PASSWORD=”YOUR_PASSWORD”;
In the Fastfile, we use environmentVariable(get:) to get the value of the environment variable. By using the environment variable, we can avoid showing the password in the code and greatly improve the security.
Back to the importCertificate(), the certificatePath is the path of your .p12 certificate file. We create a enum named “ProjectSetting” to keep the shared project setting. Here we also use the environment variable to pass the password.
After importing the certificate, we are going to set up the provisioning profile. We use updateProjectProvisioning:
This action gets the provisioning profile, imports it and modifies your project setting in the specified configuration. The profile parameter is the path to the provisioning profile. The target filter uses regular expression notation to find the target that we want to modify. Note that the updateProjectProvisioning does modify your project file, so please be careful if you want to run it on your local machine. It doesn’t matter to CD task since the CD system won’t commit any change to the repository.
Okay, we finished the code signing part! The following part would be quite straightforward, so bear with me!
Let’s build an app now:
buildApp helps you build and export your project. It calls xcodebuild under the hood. Every parameter is intuitive except the exportOptions. Let take a look at it:
Unlike other parameters, it’s a dictionary. “signingStyle” is how you want to sign your code, we put “manual” here. “provisioningProfiles” is also a dictionary. It’s the mapping between the app id and the corresponding provisioning profile. Finally we finished the fastlane setup! Now you can do this:
bundle exec fastlane qaRelease
or this:
bundle exec fastlane developerRelease
to release test build with proper configurations!
Jenkins’ll be your server for tonight
Jenkins is an automation server that helps you to perform the CI/CD tasks. It runs a web GUI interface and is pretty easy to customize, so it’s a great choice for an agile team. The rule of the Jenkins in our project can be depicted in the following graph:
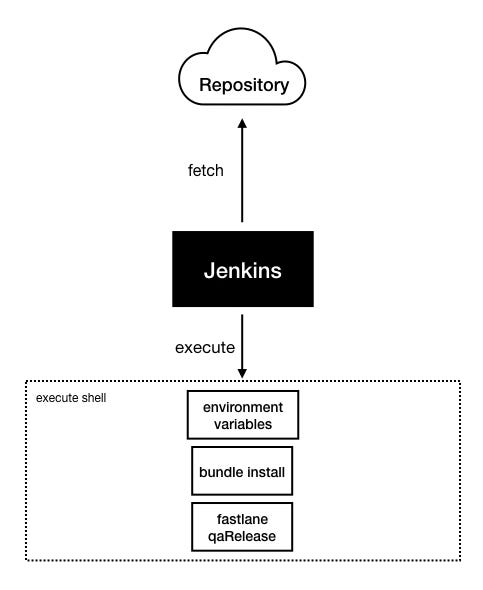
The Jenkins fetches the latest code of the project and runs tasks periodically for you. In the execute shell section, we can see that Jenkins actually performs the task that we just did in the previous sections. But now we don’t need to do them ourselves, Jenkins does this for you seamlessly!
Start from the nightly build job, let’s start to create a Jenkins task. First, we create a “freestyle project”, and enter the “Configure” page of it. The first thing we need to configure is the Source Code Management(SCM) section:

Repository URL is the source code url of the project. If your repository is a private one, you need to add Credentials to get the access to the repository. You can set target branch in the Branches to build, usually it’s your default branch.
Then, below we can see Builder Trigger section. In this section we can decide what’s going to be the trigger of the build job. According to our workflow, we want it to start every weeknight.
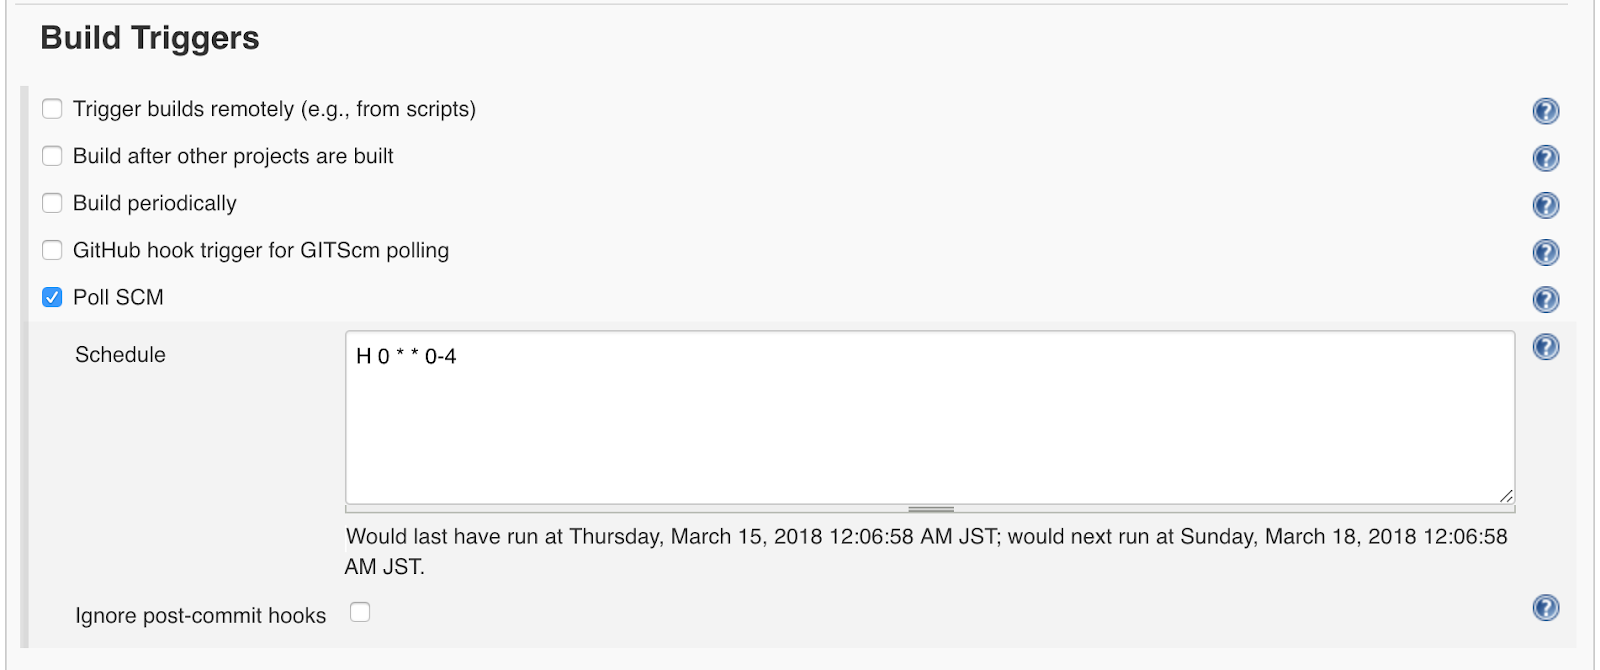
So we check the Poll SCM, it means that the Jenkins will poll the designated repository periodically. In the schedule text area:
H 0 * * 0–4
What does it mean? Let’s check the official instruction:
It consists of five fields:
- minute
- hour
- day
- month
- weekday
The field could be a number. We can also use “*” to represent “all” numbers. And we use “H” to represent a hash, auto-selected “one” number.
So our schedule:
H 0 * * 0–4
means: the job runs at certain minute from 0am to 1am every night, from Sunday to Thursday.
Last but not least, let’s check the Build section below. Here’s the task we want Jenkins to execute:
export LC_ALL=en_US.UTF-8;
export LANG=en_US.UTF-8;export CODESIGNING_PATH=”/path/to/cert”;
export CERTIFICATE_PASSWORD=”xxx”;
export KEYCHAIN_NAME=”XXXXXXXX”;
export KEYCHAIN_PASSWORD=”xxxxxxxxxxxxxx”bundle install — path vendor/bundler
bundle exec fastlane developerRelease
First 6 lines are setting the environment variables that we described before. And the 7th line installs the dependency, including the fastlane. Then the last line executes a lane named “developerRelease”. To sum up, this task builds and uploads a developerRelease every weekday night. This is our first nightly build! 🚀
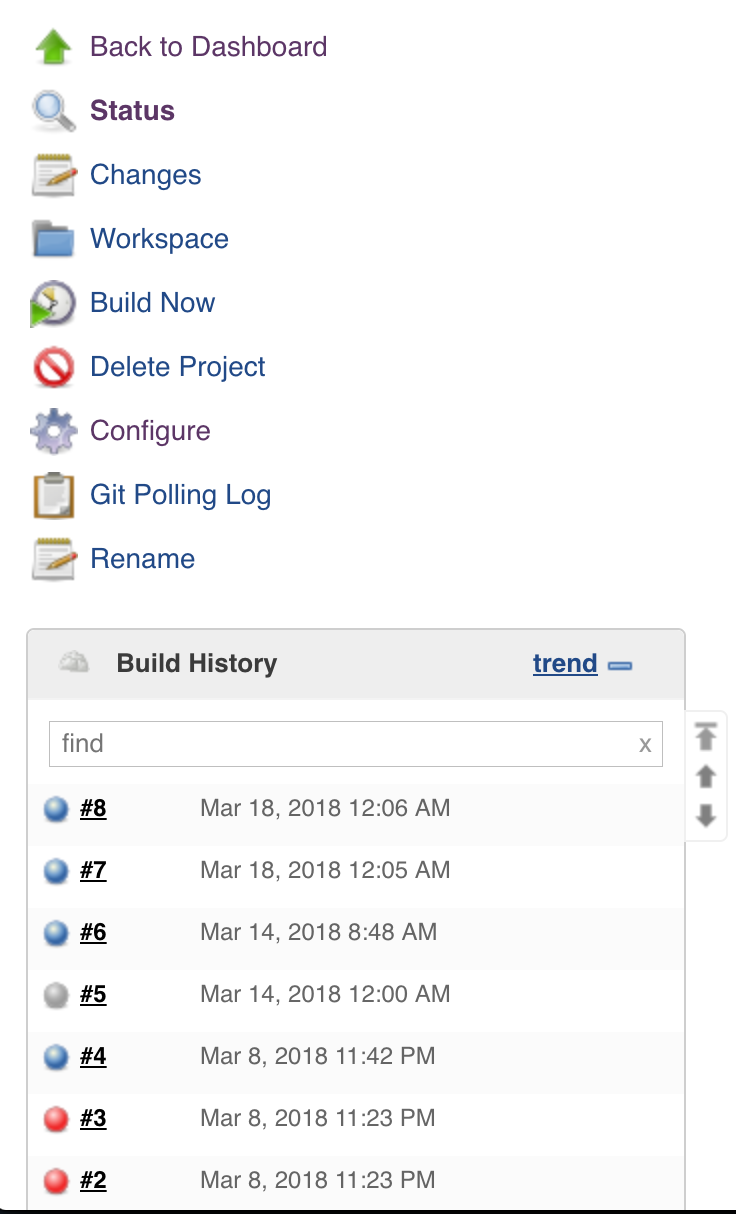
You can check the building status by clicking the build number in the side menu of a Jenkins project page:
Summary
Together with you we have learned how to create a CD system with fastlane and Jenkins. We understood how to manually manage the code signing. And we created a lane running the task for us automatically. We also explored how to switch the configuration without changing the code. Finally, we built a CD system that builds an app every night.
Although many iOS/macOS applications are created in one-man teams, automating the delivery process is still a high-leverage improvement. By automating the process, we can reduce the risk of delivering with a wrong configuration, avoid being stuck by expired code signing and reduce the waiting time of the build upload.
The workflow introduced in this article might not be exactly the same with yours, but it’s really important to know that every team has its own workflow and pace. So you must create your own CD system to meet the need of your team. By using the techniques as building blocks, you must be able to build a new customized and better-fit CD system yourself!